Rod Reassembly
A cautionary tale
Rod reassembly is simple but critical. Do it right and it's a piece of cake. Do it wrong and three expensive parts are permanently jammed together - and I do mean permanently.
I recently received some rod parts that the sender said were stuck together. Upon receiving them, I knew exactly what had happened. This article is written in hope that his misfortune can help spare others the same misfortune. That way, at least some good can come out of it.
I frequently tell new tenkara anglers to disassemble their rods after fishing, because putting a rod away wet - particularly for a long time in a humid environment - can ruin the finish.
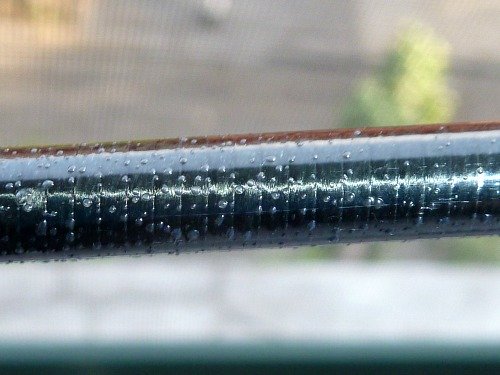 Putting a rod away wet can ruin the finish.
Taking the rod apart is easy, just remove the grip screw cap at the butt end of the rod. Careful, though. Once the grip screw cap is removed, all the parts can slide out if you inadvertently tip the rod.
I would highly recommend laying out all the parts on a flat surface. Choose one where nothing heavy will be put on top of them (and where the cat won't jump up and start playing with them).
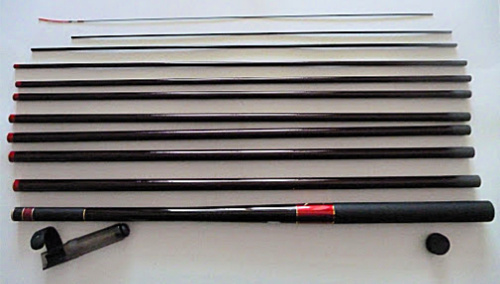 Rod disassembled for drying overnight.
Even more critical is laying them out in the proper alignment, with all the tips facing one way and the butt ends facing the other way.
Laying them in the proper alignment now makes it much less likely that you will assemble the rod incorrectly.
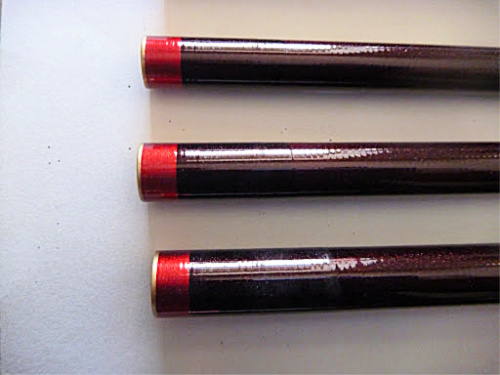 Section tip ends usually have colored bands.
For all the rods I can think of, the section tip ends (the end that is toward the rod tip) have colored bands. In some cases it might be just a thin gold or silver ring at the very tip or a shading of the paint job to a slightly different color. The second and occasionally the third section (counting the rod tip section as the first section) generally do not have any colored bands, so great care must be taken aligning those sections.
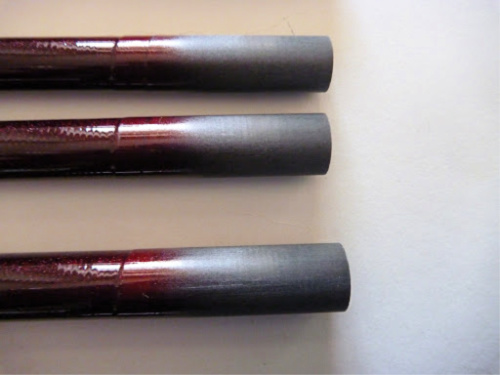 Section butt ends are unpainted, dull gray graphite.
The butt ends of the sections (including the second and third sections) are unpainted, dull gray graphite.
Reassembly
To reassemble the rod, I always start by inserting the lillian end of the tip section into the butt end of the #2 section. Then the two of them together are inserted into the butt end of the #3 section, and so on until the rod is fully assembled.
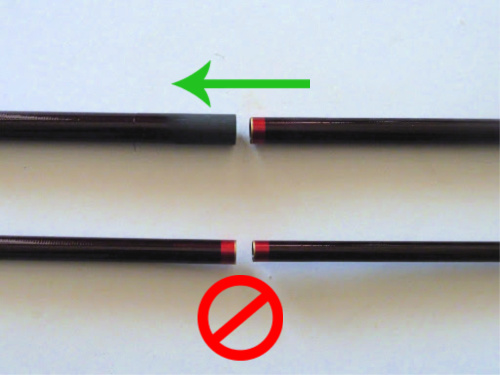
It is absolutely critical that in each case, the tip end is inserted into the butt end. Be extremely careful that you do not insert the tip end into the tip end of the next larger section.
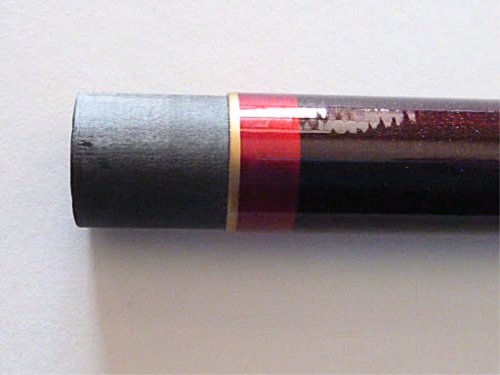 Result of tip end inserted into tip end.
The photo above shows what it looks like when the tip end of one section is inserted into the tip end of the next larger section. It gets stuck. If pressure is applied to try to push it the rest of the way in, the sections will be stuck PERMANENTLY - and I do mean permanently.
People have sent me stuck sections like this in the past. It is usually hopeless. Once, and only once, I happened to have a wooden dowel of exactly the right diameter, and was able to free the stuck section by repeatedly tapping (hard!) on the end of the dowel to push the stuck section back out. It is extremely unlikely that you will have the right sized dowel, but check a good hardware store before throwing the stuck sections away - which is the only other option. If the dowel is just a little too big, it won't fit into the end of the larger section. If it is just a little too small, after one or two taps, the dowel will also be stuck - permanently. It has to be EXACT!
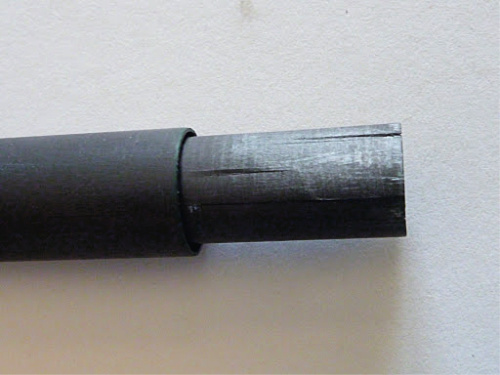 Next smaller section inserted - and also stuck.
If the next smaller section is then inserted "correctly" it will get stuck also, as it is again a situation of the tip end inserted into the tip end (of the previously stuck section). Now all three sections are stuck. The butt end of the smallest section was also cracked. I'm not sure how that happened, but it appears that quite a bit of force was applied to try to get the sections to nest properly.
The unfortunate gentleman who owns this rod now has to replace three sections, which altogether cost nearly half as much as a brand new rod. Doubly unfortunate, this situation is not covered by the rod's warranty.
When reassembling the rod, each section should slide into then next larger section with no force required whatsoever. If it doesn't slide ALL THE WAY IN as if it belonged there (which it does) then something is in backwards. Do not apply pressure. If it doesn't slide all the way in pull it back out and reassess the situation.
Update 3/5/19
I have just learned of a method which should allow you to free stuck sections. I have not tried it but it makes sense and I believe it would work. Raymond R, who told me about it, said he is confident it would have freed the stuck sections shown above.
Wrap several rubber bands tightly around the visible part of the "inside" stuck section, one on top of the other to form a hard mound of tightly wrapped rubber bands. Do the same on the "outside" section, a few inches down from the first rubber band mound. Put on a pair of rubber kitchen gloves, grasp both sections on the mounds of rubber bands and attempt to twist the sections in opposite directions while slightly pulling them apart (or pushing them apart, depending on how you can generate the most force). Most of the force should be twisting, not pulling, though. If at first it doesn't work, add more rubber bands. If it still doesn't work, add more rubber bands! Eventually, you will be able to get a firm enough grip on the two sections to free them.
Still, better to not get them stuck in the first place!
TenkaraBum Home > Rod Care > Rod Reassembly
“The bitterness of poor quality remains long after the sweetness of low price is forgotten” - Benjamin Franklin
"Be sure in casting, that your fly fall first into the water, for if the line fall first, it scares or frightens the fish..." -
Col. Robert Venables 1662
As age slows my pace, I will become more like the heron.
We've all had situations where seriously chewed up flies kept catching fish after fish after fish. It is no sin to tie flies that come off the vise looking seriously chewed up.
Warning:
The hooks are sharp.
The coffee's hot.
The fish are slippery when wet.
Beware of the Dogma
All the hooks sold on TenkaraBum.com, whether packaged as loose hooks or incorporated into flies, are sharp - or as Daiichi says on their hook packages, Dangerously Sharp. Some have barbs, which make removal from skin, eyes or clothing difficult. Wear eye protection. Wear a broad-brimmed hat. If you fish with or around children, bend down all hook barbs and make sure the children wear eye protection and broad-brimmed hats. Be aware of your back cast so no one gets hooked.
Also, all the rods sold on TenkaraBum.com will conduct electricity. Do not, under any circumstances, fish during a thunder storm. Consider any fishing rod to be a lightning rod! Fishing rods can and do get hit by lightning!
What's in stock?
Kurenai II AR 33F
Kurenai II AR 39F
Furaibo TF39
Furaibo TF39TA
Nissin Oni Tenkara Line
If you enjoy spin fishing or baitcasting please visit my sister site Finesse-Fishing.com.


