The Park Avenue Worm Ranch
by Les Albjerg
Red Wigglers are the best fishing worms. Buying them is difficult at times. Raising them is easy.
This article is about raising Red Wigglers for fishing in a way that is easy and convenient. We aren't composting. Raising them in an "urban" environment can be a challenge. Having worms in the house or apartment can lead to spousal friction.
With those challenges in mind, I have spent the last 5 months working on several worm projects. I would like to share the system I have worked out that allows you to grow your fishing worms discretely in the house with minimal space. I call it "The Park Avenue Worm Ranch."
I worked one summer in New York City. I walked down a good portion of Park Avenue in New York every day that summer. It is an amazing place. The luxury, expensive shops, restaurants, and amazing apartments. I could go on and on.
As I was making this system, it reminded me of Park Avenue. These worms are living in luxury. They are in a fairly crowded space. It just fit. For a little more background on Red Wigglers, I would suggest you read the "Red Wigglers" article on this website.
In preparation for this article as well as for my personal education, I talked to two vermiculturalists. I found out the "natural environment" of red wigglers is a manure pile. The gentleman in Oregon raises his wigglers and produces fertilizer by composting horse manure. The gentleman I talked to here in Idaho does the same thing except he uses manure from dairies. The environment of the "Park Avenue" is far from that! This system only works when the Wigglers are kept in a controlled temperature between 50 degrees and 85 degrees.
I have
been successful in maintaining a stock of about 400 worms using this
method. I began with 200 worms. You may be thinking, "Wow, I don't
need anything close to that many worms!" In my records, I rarely use
more than two dozen on a given day. However, one great day of fishing
for sunfish with my son we went through 180 worms. On a weekend trip in
the mountains we went through 120 worms. The good thing is once your
Ranch is going, and you deplete the worms they reproduce. The population is self-limiting, though. If they get too crowded they stop breeding. As you take worms for fishing, reducing the population, they start again.
Many places that offer Red Wigglers online want to sell a pound of worms, which is definitely too many for the approach outlined here. I called two of the commercial Red Wiggler farmers and they were willing to sell me a quarter pound of wigglers when I asked them. My best luck was calling the extension service and getting the name of some composters. I told the gal I called that I was a beginner and wanted to start with a couple of hundred worms. When I went and got the worms (the ones in the fourth picture below), I didn't tell the gal what I was doing with them in the end. She was excited to "get me started." She offered me free worms, but I gave her a $10.00 as a thank you.
Unlike Night Crawlers, Red Wigglers are social worms and seem to like it more crowded. Keep in mind, Red Wigglers like to be in the dark. Where it is dark is the best place to keep your Ranch. I'm keeping mine in a closet. This isn't the cheapest set-up. It is going to cost you around $50.00 to set up your "Park Avenue." Your two biggest expenses are the stainless steel bucket and possibly the worms. The truth is that isn't really that expensive. My buddy Josh and I just spent $150.00 on fly tying materials for steelhead season this year. We will lose a lot of flies in our season. This is about enough material for 200 flies. It is going to take a lot more time to tie the flies than to set up a "Park Avenue Worm Ranch."
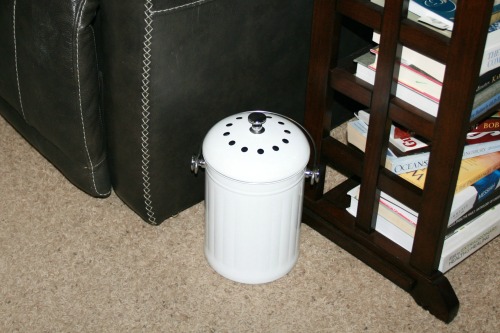 The Worm Ranch in the Family Room
THE ESSENTIALS
- You need a 1 or 1.3 gallon "Composting Pail." They are not hard to find. Put "Composting Pail" in your search engine and it will come up. You want one with the holes in the top and the carbon filter. They come in various colors. I bought a white one. I wish I had just gone with a plain stainless steel one. I wouldn't get the ceramic ones or the plastic ones without the holes and carbon filter. This summer when I go on a weekend trip, the "Ranch" is coming with me. Metal is tougher.
- The most important piece of this system is you MUST use Miracle Gro Moisture Control Potting Soil. It not only has the bedding, but food as well. One of the key ingredients in it is coir. Coir is made from coconut shells. It is "Porterhouse Steak" to a Red Wiggler. There is also other stuff in there that they love to eat. You can get it in an 8 quart bag. That should last you at least a year. It has to be the "Moisture Control." The other benefit, is you can under or over water a little and not be in as much trouble. You can find this at any of the Big Box stores.
- Cricket Food. Yep, that is right. Cricket food supplies the vital minerals and vitamins for your Wigglers. Most important it has the grit for the gizzard. Make sure it is in the fine powder form. I checked with 4 pet stores in my area and they all had it. You don't need a big jar of it. A little goes a long ways. You won't get good healthy worms and reproduction without it.
- Corn Meal. It doesn't matter what color. You can get a small box at any grocery store. My guys are enjoying some very nice organic blue cornmeal right now that was marked off 70% at the store.
- Twenty or so one inch square pieces of cardboard. You want just plain corrugated cardboard. The squares don't have to be perfect. These are put on the bottom for two reasons. They provide moisture control. Worms love to lay their eggs in the corrugations in the cardboard. They will also eat the cardboard if you forget to feed them.
- 100 - 400 Red Wiggler Worms. There are lots of places you can buy wigglers on the Internet. The first ones I got I bought off the Internet. The second group of Red Wigglers I got through the Master Gardener Program. They put me in touch with some local vermiculturalists. I suggest you start with 200 worms. If you are going to be fishing a lot right away, then I would go with more. Caution: This system will not handle more than 400 worms. If you buy a pound of worms (about a thousand) you will overwhelm this setup and have a mess.
- Water
HOW TO SET UP YOUR PARK AVENUE WORM RANCH
Number one: The first thing you want to do is wash your new Composting Pail bottom with mild soap and water. Check to make sure there isn't a cardboard packaging ring in the top blocking your Carbon Filter. Your worms need air. There is plenty of air coming through the carbon filter and the holes. The carbon will make sure there is no smell.
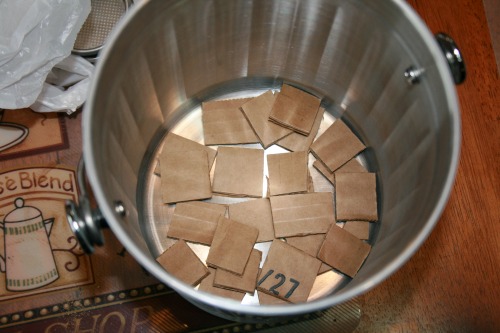 Cardboard squares in the bottom
Number two: Randomly toss the cardboard squares in the bottom of the pail.
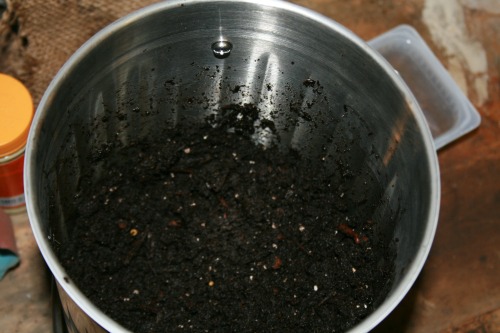 Bedding in the pail
Number
three: Overwatering is the major problem with raising these little
guys. Here is what I recommend. Put 10 cups of your potting soil in a
large bowl. Add 2 cups of water and mix well. If it is too wet add a
bit more potting soil. Your soil should not feel wet or dry. It should
feel moist. If you squeeze a handful of the soil, you should get drips
but not a steady stream of water. If it is too dry add a bit more
water. You only want your
Compost Pail to be from 1/3 to 1/2 full at this time. A little too wet
is better than a little too dry. Have fun playing in "the dirt." I
highly recommend that you prepare your bedding before you get your
worms. This gives it time to stabilize and settle in.
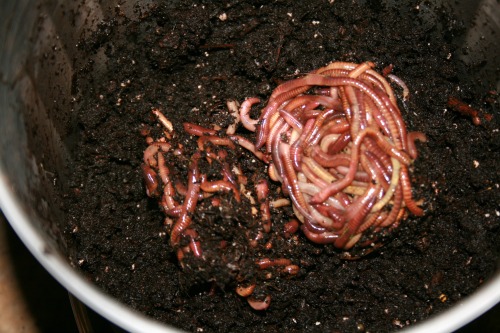 200 wigglers transferred to the pail.
Number four: When you get your worms, follow the instructions from the place you bought them if they were sent by mail. If you got them locally, gently put them in the pail, and put the top on. They will work their way down into the bedding. Your worms might be a little lethargic for the first couple of days as they get used to their new environment. I wouldn't feed them for the first few days. There is food in the potting soil.
Number five: After two or three days, take your Ranch over to
the sink or outside, or in the garage, take the cover off and get your
hands dirty. Stir up the bedding gently, worms and all. Red Wigglers
don't bite! You want to fluff the bedding materials. Kind of smooth
the top. Lightly Sprinkle a small amount of Cricket Food and put the
top back on. I'm not sure where you are going to keep your pail, but
put it back. You will get a feel if you need to add moisture. A spray
bottle is convenient but not necessary. You shouldn't have to add water
more than once a week. You should only have to tend your worms once a
week. Slightly wetter is better than too dry.
Number six: Check the next day to see if your worms have consumed the Cricket Food. If not, you gave them too much. No big deal, they will get to it eventually.
MAINTAINING YOUR PARK AVENUE WORM RANCH
You are not raising worms for compost. You are raising them for fishing. The volume of "Black Gold" or technically, "castings," is not the goal. Most of the information on the internet or books on Red Wigglers is written for composting, not raising worms for fishing. I am doing some composting, so I am doing several different things with my wigglers. The goal here is a healthy supply of fishing worms. Growing them in a small space requires some pampering.
After a week or
two, a little supplemental feeding with the corn meal really gets them
growing. One teaspoon a week or every other week sprinkled on the top is
enough. Don't overfeed! Overfeeding with cornmeal will cause it to
ferment which isn't good. Feed the corn meal at the same time as you
give a dusting of the Cricket Food. A jar of Cricket food should last
four to six months.
In two or three weeks your Ranch will be stable.
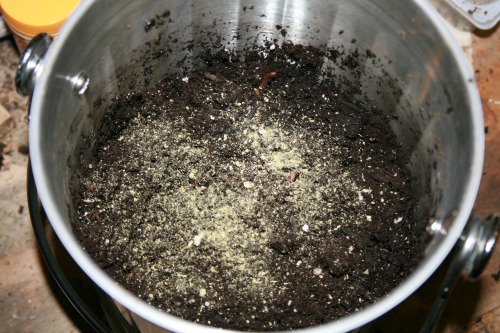 A dusting of cricket food
This is how simple it really is. Once a week here is what you do: Take the Ranch to the sink or outside, or in the backyard - anywhere that won't offend the family. Get you hands in the pail, and stir up the and fluff the soil. Check for dry or wet spots. Your soil should not feel wet or dry. Moist is what you want. How are your worms doing? Add a little water if needed. Smooth out the top. Sprinkle a dusting of Cricket food and one teaspoon of cornmeal. You are done with your worms for the week unless you are going fishing!. If you miss a week, they will be just fine. I've ignored mine for two weeks, and they were just as active. They are not fussy! Just as overwatering is a common beginner mistake, overfeeding is too. Most beginners feed their worms too much (and feeding them too much can kill them!)
When it is time to go fishing, harvest a dozen or two. I usually pull some bedding off the edge into my bait box. When you are done fishing, bring the left over worms home and put them in with their buddies.
About once a month to six weeks add a half inch of new Potting Soil to your ranch. Stir it in, and make sure you add a little water at the same time. What you are doing is replacing the "food" that is in the bedding. Plan of doing a complete bedding replacement 2 or 3 times a year. Red Wigglers like to live near the top of their environment. So, filling the Bucket isn't going to give you a substantial increase in wigglers. I like at least 3 to 4 inches of room at the top to fluff the bedding. Fluffing the bedding is very important.
The way to tell if your Ranch is healthy is finding baby, teenage, and adult worms. You can look for egg capsules as well. They are kind of small, about 1/8" in diameter, and amber colored. As long as you see babies you are in great shape.
One of my goals last year was to do a lot more fishing. I found several ponds close to the house so I could have a enjoyable one-hour fishing sessions. Being able to be in the car in less than 5 minutes with everything I need to fish with gave me several opportunities to have an enjoyable fishing session with a total time of one hour to two hours.
Red Wigglers really do catch fish. Last summer I was fishing at Caldwell Ponds. I was having a blast catching sunfish and pumpkinseeds. I was fishing off one of the docks. A 12 year old came down and joined me fishing. He was using half dead night crawlers. I was out fishing him three to one. His Dad had only given him three worms. (Dad and family were fishing on the other dock.) He was using half worms and ran out. He was heading over to get more from his Dad, and said, "Here let me set you up with a Red Wiggler." I showed him how to hook it, and even with his bigger hook, he was catching more fish! When I left, I gave him the rest of my wigglers. He said, "Thanks for the super worms!"
This is the most convenient way I have found to have fresh worms ready anytime, without them being conspicuous. Give it a try!
TenkaraBum Home > Worm Fishing > Park Avenue Worm Ranch
“The bitterness of poor quality remains long after the sweetness of low price is forgotten” - Benjamin Franklin
"Be sure in casting, that your fly fall first into the water, for if the line fall first, it scares or frightens the fish..." -
Col. Robert Venables 1662
As age slows my pace, I will become more like the heron.
We've all had situations where seriously chewed up flies kept catching fish after fish after fish. It is no sin to tie flies that come off the vise looking seriously chewed up.
Warning:
The hooks are sharp.
The coffee's hot.
The fish are slippery when wet.
Beware of the Dogma
All the hooks sold on TenkaraBum.com, whether packaged as loose hooks or incorporated into flies, are sharp - or as Daiichi says on their hook packages, Dangerously Sharp. Some have barbs, which make removal from skin, eyes or clothing difficult. Wear eye protection. Wear a broad-brimmed hat. If you fish with or around children, bend down all hook barbs and make sure the children wear eye protection and broad-brimmed hats. Be aware of your back cast so no one gets hooked.
Also, all the rods sold on TenkaraBum.com will conduct electricity. Do not, under any circumstances, fish during a thunder storm. Consider any fishing rod to be a lightning rod! Fishing rods can and do get hit by lightning!
What's in stock?
Kurenai II AR 33F
Kurenai II AR 39F
Furaibo TF39
Furaibo TF39TA
Nissin Oni Tenkara Line
If you enjoy spin fishing or baitcasting please visit my sister site Finesse-Fishing.com.


